http://www.sew-aneedlepullingthread.blogspot.com/
True Random Number Generator
Min: 1
Max: 402
Result: 133
Powered by RANDOM.ORG
If you entered on the other blogs listed below in the Blog Hop,
check their sites for their winners today!
Thanks for all the nice comments!
Let's do it again soon!
-Lucy
So I told ya I was gonna do something fun with this stuff!
This is an official BLOG HOP!
I'm gonna show you my little tutorial on this awesome
Dragon Tail using this little tool....
the I-TOP Tool by Imaginisce... But FIRST-
If ya wanna chance to get your own I-Rock Kit by Imaginisce, you are going to have 5 separate chances TODAY during the Imaginisce Blog Hop!
Here's what ya gotta do:
1. Become a Follower over on my side bar, & LEAVE a COMMENT HERE with contact information.
2. Go to each respective blog involved and check out their fun projects using the Imaginisce products
(don't worry, you're gonna LOVE these girls if ya don't already!) and become a Follower on their blogs:
(They have other ways to increase your odds of winning like their facebook page)
That's 5 separate chances to win an entire I-Rock kit!
Contest winners will be announced on Friday April 22nd on each blog!
I-Rock Kit might look something like this... (minus the hat because that's mine:)
It's super fun to bling out all sorts of things!
But- before you go do all that... here is my Dragon Tail Tutorial... because
I promised my Nolan I'd make him one :)
I borrowed this great tutorial from
Stinkin CUTE!
But here's my rendition using the I-Top Button Toppers for the spots.
SUPPLIES:
1/2 to 3/4 yard main fabric-- I used Flannel
1/4 yard spike fabric
5" Velcro
Polyfil batting (small bag)
and.....
 |
I-Top Tool & 1pkg. of Large Button Toppers & 1 pkg. of Medium Button Toppers
CUT LIST: MAIN FABRIC: tail: (cut 2): 22" x 11" waist straps: (cut 4): 12" x 3" circle: 7" in diameter (*I cut a 7" square, fold it in fourths, then cut the curve from fold to fold) CONTRASTING FABRIC: spikes (cut 2): 22" x 3.5"
I-Top Tool with Large and Medium Button Toppers for spots
Contrasting Fabric scraps (2"x 2") for each spot.
INSTRUCTIONS:
1. Trim tail pieces:
Taking your two strips 22" x 11", lay them face down. On one end you'll measure 4.5" from each side. The two inches left in the middle will be the tip of the tail. On the other end, you'll measure 4" along the sides as a marker. Connect these two markings to create a diagonal for the cone shape of the tail. Cut off the triangular sides and throw them away. |
2. Make Spike Strip
NOTE: To make the spikes easier, you could cut 1 strip out of felt or fleece and just cut out a spike strip leaving the raw edges that won't fray, rather than sewing your spikes with 2 strips of fabric.
Take your two spike strips and lay them right sides together. Draw a row of triangles along the strip for the tail spikes. Begin at one end and work your way to the other, making the spikes shorter and narrower. I left about 1/2" between each spike.
3. Spikes:
Using machine, follow spike lines with needle pivoting at the corners by raising presser foot and turning fabric. Clip seam allowance to 1/4" and clip your top corners flat, clip in the valleys to help keep shape after you turn Right Side Out.
... like this. Now turn and press well.
Set aside while you work on your spots.
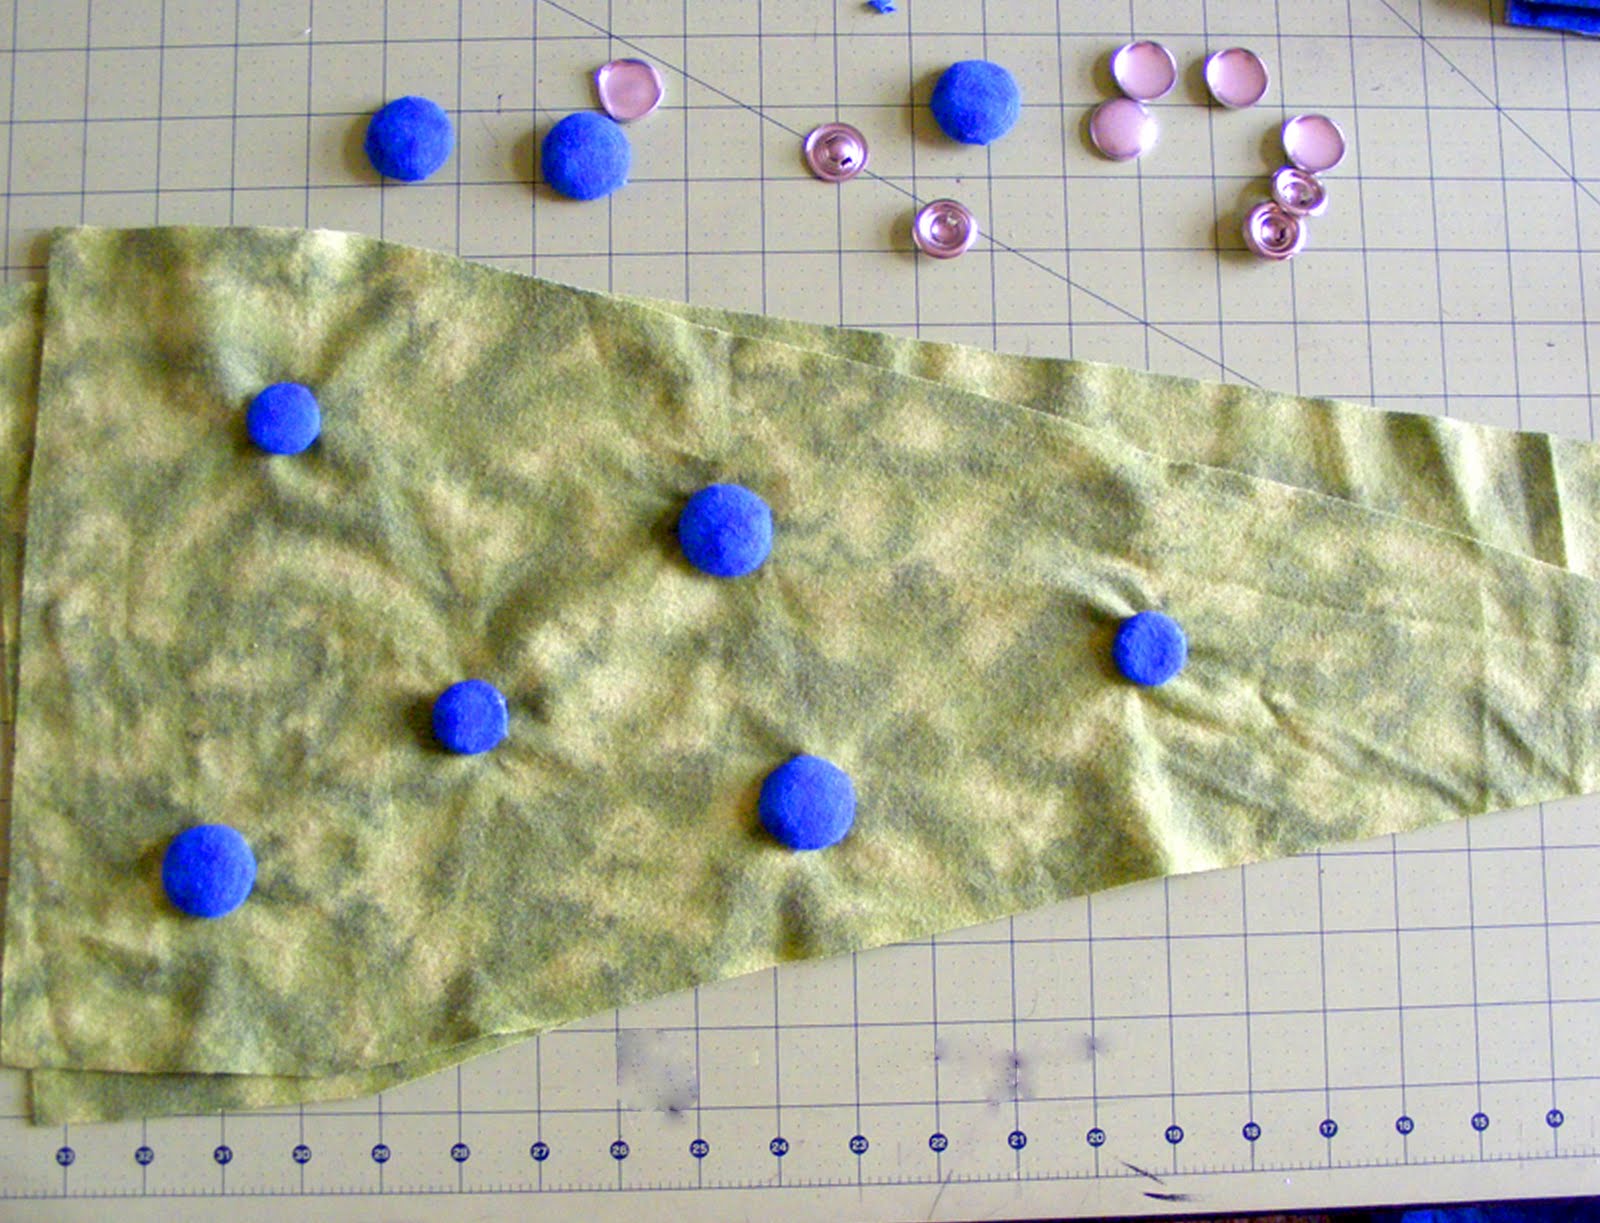
4. SPOTS:
Take I-Top Tool and Contrasting Fabric scraps.
Trim to about 1" around each Button Topper.
Fold fabric inside of Top half of Button Topper and drop into large rubber head.
With fabric all tucked in, place the back of the button on top of fabric,
Turn back (small side) of the I-Top Tool lining it up with the back of the button. Squeeze gently.
Peel rubber back and covered button should pop out!
Repeat for all SPOTS.
5. Spots to Tail:
Now you can decide where you want them placed on your Tail Pieces.
Sew onto Tail Pieces like you would a button, securing well. Once both sides are finished, you can take your SPIKES, and lay them Raw edges together, on top of the Right side of a Tail Piece with spikes pointing in towards center. Pin.
You can baste at 1/4".
6. Put Tail Together:
Next lay other Tail Side on top of spikes, Right Sides Facing!
Pin well. Decide where you want your opening for turning. I put mine on the opposite side of the Spikes. Stitch around both sides of Tail 1/2" seam allowance catching valley's of Spikes, (skipping those 4" to 5" for turning later) Leave Large end open.
7. Straps:
Take straps and lay them Right Sides Together. Stitch 1/4" around 3 edges leaving a short end open for turning. Clip corners and turn Right Side out and press.
Top stitch around all 3 edges.
Take Velcro strips and center on each Strap about 1" below closed short end. Pin and stitch around Velcro. (I do it a few times since they get a lot of tug and pull).
Next, Find the Center of your Tail by folding it in half and marking the center of each side with a pin. This is where you will put the waste straps.
This is very important!
* One strap must have Velcro face up, and the other side must have the Velcro against the inside side.
Stitch both straps on using a 1/4" seam allowance.
8. Closing Up Large End:
Take 7" circle and pin around opening at the large end- Right Sides Together.
Stitch around entire circle using 1/4" seam.
Turn Right side out through large side opening.
Stuff with Polyfill.
Pin opening together and stitch closed using a whip or ladder stitch.
You Got yourself a Dragon Tail there Mister!
Thanks for stopping by and don't forget to check back to see who the winner is on Friday April 22nd!
at first I couldn't get him to growl for me.... then, I couldn't get him to stop!
Ha!